v2.27.4 (Summer '24)
Check your Server URL Custom Setting immediately after upgrading
From version 2.27.4 onward, the Server URL in Unaric Payments Custom Settings strictly requires the https:// prefix to be configured. Consequently, if you have custom fields, payment links, or custom email templates manually prefixed with https:// (e.g., hard-coding https://{!asp04__Payment_URL__c}), this upgrade will result in double prefixing (creating broken links like https://https://customdomain...).
What you need to do
- Check your custom setups: Verify if any custom code, formulas, or third-party integrations are manually prepending https:// to the Unaric Payments payment URL and remove your manual prefix so the URL does not double up.
- Adjust your Custom Settings. Navigate to Setup > Quick Find > Custom Settings > Unaric Payments settings > Server URL and ensure it has the https:// prefix.
Customisable Domain for Payment & Authorisation URL (live.protectedpayments.net)
You can now customise the subdomain for your payment and authorisation URLs to better align with your brand, using the format <mycustomsubdomain>.protectedpayments.net. To enable this feature, follow the steps outlined below.
Create an External Client App in Salesforce
- Navigate to Setup > External Client Apps > External Client App Manager.
- Click New External Client App.
- Provide a name, API name, and contact email for the app.
- Set Distribution State to Local.
- Open the API (Enable OAuth Settings) expandable and check Enable OAuth.
- Under Callback URL, enter your URL, including the https prefix, e.g., https://mycustomdomain.protectedpayments.net (ensure it ends with .protectedpayments.net).
- Under OAuth Scope, select Full access (full) and Perform requests at any time (refresh_token, offline_access).
- Under Security, ensure Require secret for Web Server Flow is checked.
- Click Create.
- Open your newly created app from the list.
- Go to the Settings tab and expand OAuth Settings.
- Click Consumer Key and Secret to view them. Note them down for use in step 4.
Configure Custom Settings
- Go to Setup > Custom Code > Custom Settings.
- Select Unaric Payments settings.
- Click Manage and Edit.
- In the Server URL field, enter the full URL, including the https prefix (e.g., https://mycustomdomain.protectedpayments.net).
Ensure your external integrations, custom formula fields, or custom email templates do not also hardcode the https:// prefix, as this will result in invalid "double https://" URLs.
- Click Save.
Contact support
Contact [email protected] to add your custom domain to our server. We will need to know the domain and also whether it is for test or production.
Reconnect Unaric Payments with Salesforce
- Open the Unaric Payments Setup tab.
- Click Setup Configuration and enter the Client and Secret Key obtained in step 1.
- Click Connect and Reconnect Salesforce to complete the authentication.
- To verify configuration, ensure all sections on the setup page have green ticks, indicating successful setup.
Test your custom domain
Create a new authorisation or payment record to test your new custom URL.
Additional Payment Options: Apple and Google Pay
We have provided the ability for you to collect payments via Apple or Google Pay, allowing enhanced customer convenience which may lead to higher conversion rates, giving you a competitive edge.
How it works
Both Apple and Google Pay work off Card payment rails. To use this, you should have 'Card' as the Payment Route Option on either the authorisation or payment record. If there is an active card in the wallet, then Apple or Google Pay will appear as the payment option alongside card on that payment page. If an active wallet does not exist, your users will not see this an an option to pay by.
Setup
At the time of this release, supported PSP connectors are Stripe Connect and Payonomy Gateway. Other PSPs will be available in the future or upon request. Please speak to our support team for assistance at [email protected].
Create a PSP Connection under your merchant group for 'ECOM' for GBP. On the Authorisation or Payment record/s make sure that Card is set in the Payment Route Options field
Apple Pay
- Contact your PSP to enable Apple Pay.
- Contact Unaric Payments support to enable Apple Pay for each Merchant Group you wish to use this as a payment option for.
- Domain Verification (if using an iFrame):
- Inform Unaric Payments support of your domain URL(s).
- Support will register your domain with Apple and provide verification files.
- Host these files on your server for verification.
- Complete these steps at least 2-3 days before going live to ensure proper propagation.
If using an iFrame for Apple Pay:
- The upload of these files is time-sensitive and needs actioning as soon as possible after the files have been generated by us.
- We would advise that this is done at least 24 hours but ideally 2-3 days before any testing or Live payments are due to be taken on the iFramed paypage.
- The SSL certificates need to be renewed at least 2 weeks before they expire. We will advise you of the date that this is due to expire however it is your own responsibility to ensure that these are kept up to date within the timeframes given otherwise it will interrupt your Apple Pay service.
Google Pay
- Contact your PSP to enable Google Pay.
- Contact Unaric Payments support for configuration per Merchant Group.
If using an iFrame, Google Pay does not require the domain verification process.
Pure text URL for the eCommerce/Pay Now Link on both Payments and Authorisations
A plain text URL field (without the HTML tags), is now available for easier integration into email templates. To use, add the field asp04__eCommerce_link__c into your desired email templates.
Defects fixed in 2.27.4
There were some defects found in Version 2.27.3 which have been fixed in 2.27.4
These are:
- The formula field (asp04__eCommerce_link__c) for the eCommerce URL was incorrectly defined on the Payment Object.
- There was a permission missing in the following permissions sets: AsperatoFullAdmin, Asperato Refund and Asperato Admin without Setup. This has been rectified and added.
Upgrade to Unaric Payments v2.27.4
If you are upgrading from versions prior to 2.22, ensure you follow the steps in the Release notes for each version. In particular, around the Merchant Group fields changesrelease notes for v2.21. This is critical to the smooth running of this version.
Ensure that the Connected User, the person who clicks Connect on the Unaric Payments Setup tab, has the Unaric Payments Full Admin permission set applied to them. This person needs to be an active user at all times in the org.
Other considerations
If you are running a package older than v2.16, please refer to release notes for all the releases in between to ensure all upgrade steps have been completed up to the latest version.
Record Type Changes - in version 2.18.1 we made some changes to introduce two new Record Types of Inbound and Outbound to our Payment and Authorisation Objects. The collections functionality is now classed as a record type of Inbound.
You must add the correct Record Type to any and all existing Asperato User’s profiles upon upgrade to version 2.18.1 and beyond.
If you are not using Outbound payments - simply remove the Outbound Record Type from the Payment and Authorisation Objects (steps on how to do this outlined in the knowledge article here)
We recommend following Salesforce Best Practices on App Upgrades by installing the package for Admins Only and in Sandbox orgs first before deploying to Production.
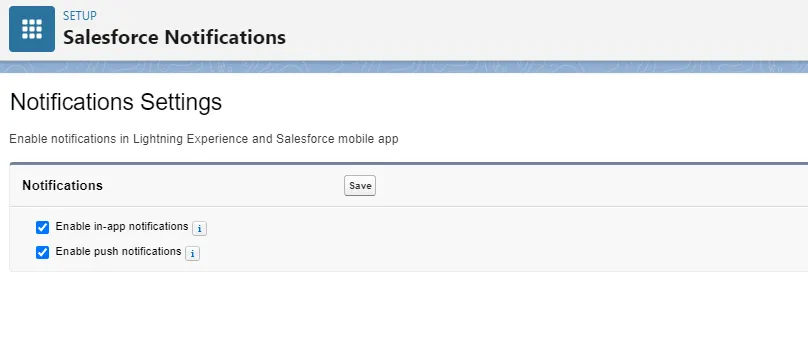
The Salesforce Setting Enable notifications in Lightning Experience and Salesforce mobile app needs to be set as follows