---
title: GoConnect Server
slug: voice-german/Z710-goconnect-server
createdAt: 2024-03-19T23:14:15.784Z
---
The Mondago GoConnect Server offers a direct connection to the Mirage Cloud service . A local installation of the CTI Data Connector - TAPI Link is not required.

## Configure Call Center Adapter
•SoftPhone handles dialing rules must be set to Y
•You have to enable using an own Login ID. See [Own Login ID to connect to PBX](docId\:iBPbiDUUr9Lgxgp6PMaja)
## Install GoConnect Server
Download and install the GoConnect Server from the GoConnect / Mirage product page
[http://microsite.mondago.com/mirage-customer/index.php](http://microsite.mondago.com/mirage-customer/index.php)
:::hint{type="danger"}
•The server requires an access to [https://\*.miragecloud.com](https://%2A.miragecloud.com/) and [https://miragecloud1.com](https://miragecloud1.com/) using port 443 with SSL
•Depending on the phone system you have to open other ports
:::
## Partner Gateway Configuration
Installations after 1/2018 start the **Mirage Server Configuration**. Previous installations: Start the GoConnect Server configuration tool *ucconfig.exe *with the parameter** -ucpg **
In the field: *User ID* match add: ^(.\*)
In the field: *User ID replace* type in **a unique ID followed by $1.**
**For security reasons a 20 digit ID is recommended which is known only to you. [Generate ID](https://www.newpasswordgenerator.com/generate.php?type=0\&length=20\&lowercase=0\&uppercase=1\&numbers=1\&symbols=0) (external Web service)**
This automatic generated ID consists of numbers and uppercase characters and works with all connectors.
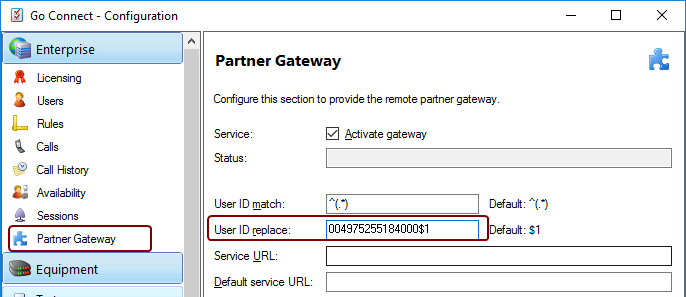
$1 will be replaced by the user extension configured in the field: **Number**
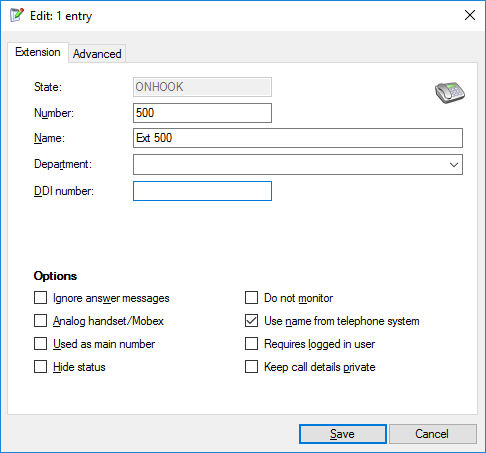
The Login ID in Salesforce is the unique ID and the** extension of the user - e.g **004975255184000**500**
•*Service URL*: [https://miragecloud1.com/MirageSwitch/MirageSwitch.asmx](https://miragecloud1.com/MirageSwitch/MirageSwitch.asmx)
•*Default Service URL*: https\://\*.miragecloud.com/OpenCTIWebService53/MirageOpenCTI.asmx (Note: This is the field *Mirage Cloud Service URL* configured in the Call Center. See [Main Setup Page - Call Center Configuration](docId:_LxYQuxisNYY5cDX65Rlb)
**Activate license**
To go from a TRIAL license to a full purchased license you need to follow these steps.
1.Select Enterprise / Licensing
2.Remove the TRIAL license from the server by pressing the ***Release license*** button. After a short time the word TRIAL will disappear from the Serial number field.
3.Enter the Full purchased license serial number into the Serial number field and press the **Register Online** button. After a short period of time you should get confirmation that the new serial has been registered and the license types, quantities, expiry date should update to reflect the new license.

## Error Tracking
See [Troubleshooting GoConnect Server](docId\:EiDt8T4WqDpvOCqCkZAif)
### Ports used
•access to [https://\*.miragecloud.com](https://%2A.miragecloud.com/) and [https://miragecloud1.com](https://miragecloud1.com/) using port 443 with SSL is required. If application access is blocked by an firewall,** https\://\*.miragecloud\*.com** should be added
Alternatively you can use the default proxy server which is configured in the system.
•Navigate to **C:\Program Files (x86)\Mirage Server\\**
•Right mouse click on **UCPartnerGateway.exe.config **to edit the file
The configuration [system.net/defaultProxy](https://helpserver.biz/onlinehelp/cdc/sf/5.0/help2000/mondago-goconnect-config.html) has to be added or modified
::Image[]{src="https://helpserver.biz/onlinehelp/cdc/sf/5.0/help2000/images/goconnect-proxy1.png" size="48" width="255" height="127" position="center" showCaption="false"}
then add the text highlighted in yellow.
::Image[]{src="https://helpserver.biz/onlinehelp/cdc/sf/5.0/help2000/images/goconnect-proxy2.png" size="80" width="550" height="434" position="center" showCaption="false"}
### Backup
In case no virtual machine is used you can backup the configuration files. They can be found in
C:\ProgramData\UCServer
Important files to backup are UCserver.mdf and UCserver\_Log.ldf.